5 Fun Seashell Crafts You Can Make Using Your Beach Collection
Give your home a beachy vibe with these easy-to-make displays!
Nothing says summer quite like beautiful seashells! The natural wonders are certainly a popular keepsake from a beach trip thanks to their beauty, and you can enjoy them all year long. For even more fun, consider turning them into homemade DIY creations! Below you’ll find five seashells crafts that can be made with your own seashell mementos or shells from the craft store, and are perfect for all ages!
Related: Studies Show Crafting Boosts Mood + Reduces Dementia Risk: 6 Easy Paper Crafts
1. Seashell crafts: Seashell heart

“Greet guests with a stunning designer-look mosaic heart that you can make yourself with seashells,” says Lauren Blum, Woman’s World crafting and DIY editor. “Make a smaller 4″-6″ seashell heart to hang from a door or cabinet knob!”
Supplies:
- 10″ wooden heart
- 2 small D-ring hangers
- Gesso Primer
- Acrylic craft paint (pearl white)
- About 120 assorted seashells
- 2 1/2″ starfish
- E6000 all-purpose adhesive
- 6-10 (6 mm) ivory pearls
- 6-10 (4 mm) ivory pearls
- 30-50 (3 mm) Swarovski flatback rhinestones;
- 2 yds. 1 1/2″ ivory satin ribbon
How-to:
Step 1: Screw D-ring hangers to back of heart near top. Prime heart with a coat of gesso. When dry, paint. Sort shells by shape and size. Paint those that aren’t white. Choose a shell type you have a lot of and glue all around the heart’s border. If colors vary; paint them all.
Step 2: Arrange a few clusters of your largest shells on the face of the heart, varying sizes and types; glue down. Next, layer smaller shells onto the edges of the clusters so they overlap a little. Add the starfish in a prominent spot.
Step 3: Fill in spaces with your smallest shells; continue until the heart is almost completely covered. If you have little scallop or clamshells, turn a few upside-down and glue into spaces like little cups. Once all shells are glued down, glue pearls and rhinestones onto them in random order. To glue a tiny gem, pick it up with tweezers, use a toothpick to dab a bit of glue on the back then set in place with tweezers. Glue tiny pearls into upside-down shells.
Step 4: Cut ribbon in half; tie each piece to one of the D-ring hangers. Pull ribbon up and knot about 6″ above the heart. Finish with a bow.
2. Seashell crafts: Seashell pets

“Kids can bring a little bit of beach magic home by transforming seashells — gathered from the shore or the crafts store — into fun pals!” says Blum.
Supplies for a puppy:
- Seashell 1 1/2″- 2″ across
- Scraps of craft foam or colored cardstock
- White cardstock at least 5″x1″
- 4 small blue gems
- Acrylic paint in brown,
red and pink - 3/8″ wiggle eyes
- Craft glue
How-to:
Step 1: To make the shell stand upright, cut cardstock 5″ long and just high enough to fit inside the shell. Glue the ends together creating a ring, squeeze a fold in one spot and glue the opposite side inside the shell.
Step 2: With the shell’s rounded side down, paint a red collar, pink cheeks and a brown mouth. Cut brown paper ears and a 3/8″ quarter-circle nose. Glue them onto the shell along
with wiggle eyes and collar gems.
Supplies for a bunny:
- Seashell 1 1/2″- 2″ across
- Scraps of craft foam or colored cardstock
- Acrylic paint in brown and pink
- 1/4″ wiggle eyes
- 1/2″ pink pompom
- Craft glue
How-to:
With shell’s rounded side down, paint pink cheeks and a brown mouth. Cut out ears from white paper and attach to shell. Add wiggle eyes, pink pompom nose and a 2 1/2″ orange craft foam carrot with green top leaves.
Supplies for a cat:
- Seashell 1 1/2″- 2″ across
- Scraps of craft foam or colored cardstock
- Acrylic paint in brown and pink
- 3/8″ wiggle eyes
- Craft glue
How-to:
With shell’s rounded side up, paint light brown markings, brown mouth, pink cheeks and tongue. Cut out ears from brown paper and attach to shell. Add wiggle eyes.
3. Seashell crafts: Seashell candle holder

“Whether you use shells found on vacation or ones from the craft store, this chic candleholder will bring a relaxed summertime vibe to your home!” shares Blum.
Supplies:
- Cylindrical glass hurricane candleholder 8″x4″
- 12-14 (1″) white scallop shells
- Beacon Quick-Grip glue
- 12-14 (8 mm) and 14-18 (6 mm) white pearls
- 48-60 assorted white and off-white seashells 1/2″- 2″ across
- 4 (4″) white starfish
- Beacon Tacky Glue
- Iridescent glitter
- Pillar candle 6″x3 3/4″
- Sand
How-to:
Step 1: Using Quick Grip, glue a row of scallop shells around the base of the candleholder. Glue 8 mm pearls in spaces between shells. Tip: Hold each shell or pearl in place for a few seconds until glue sets.
Step 2: Decorate the bottom third of the candleholder with assorted seashells, varying sizes and positions. Glue a starfish to each side of the candleholder, its top ray about 5″ from the bottom, then fill any spaces between with shells. Glue 6 mm pearls in small spaces.
Step 3: Place the candleholder in a flat box to contain spilled glitter. Working on a small area at a time, paint spaces and edges of some shells with watered-down tacky glue; dust immediately with glitter. Continue until all the spaces are glittered. When all glue is dry, use a dry paintbrush to brush off any excess glitter.
Step 4: Put 1″ of sand in the bottom of the candleholder and nestle the candle inside.
Related: How To Get Wax Out of a Candle Jar: Pros Explain When To Use Cold vs Heat
4. Seashell crafts: Seashell marine animals

“Kids will love turning their beach finds into a crew of underwater critters!” says Blum.
Supplies:
- Assortment of seashells 2 1/2″ to 3″ across
- Multi-Surface Satin Paint in red, purple, green and blue
- Craft foam in green, yellow, purple, blue, pink
- Chenille stems in red
- Glue dots
- Craft glue
- Hole punch
- Wiggle eyes
How-to:
For the crab: Paint shell red; let dry. Cut chenille stems into 6 (2″) pieces and 2 (5″) pieces. For pinchers, take 5″ stem and fold 1″ parts, accordion style. Repeat until you have 4 (1″) folds. Combine the first two folds together, then the second set of folds together. Repeat with other pincher.
Glue legs and pincher to underside of shell. Add wiggle eyes.
For the octopus: Paint shell purple; let dry. Cut 8 legs out of foam. Punch holes with pink foam; adhere to tentacles with glue dots. Glue tentacles to shell. Add wiggle eyes.
For the fish: Paint shell pink; let dry. Cut big fin and small fin out of foam. Adhere fins to shell. Add wiggle eyes.
For the turtle: Paint shell green; let dry. Cut turtle head, legs and tail out of foam. Cut and glue craft body to shell. Add wiggle eyes.
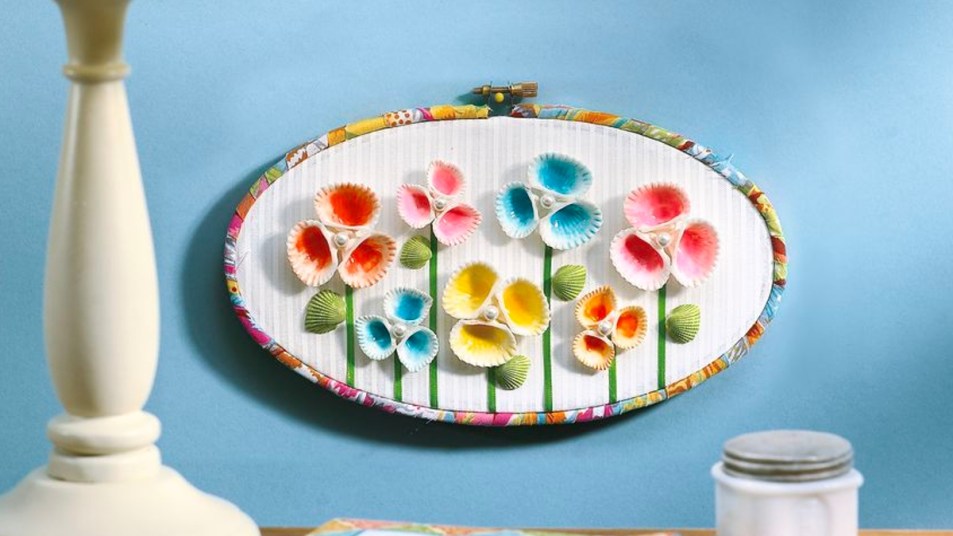
5. Seashell crafts: Seashell embroidery hoop art

“You don’t have to jump through hoops to make your own chic wall art — all you need are some fabric and seashells!” assures Blum.
Supplies:
- 9 (5/8″) and 12 (1″) white seashells for petals
- Hot glue
- 5 various sized small
white seashells for leaves - Paints in green, yellow, turquoise, coral, pink
- Triple Thick Gloss Glaze
- Small watercolor brush
- Beacon Fabri-Tac glue
- 7 (7 mm) half-pearls
- 1/4 yd. print fabric for outside
- 5 1/2″x9″ oval embroidery hoop
- 1/4 yd. cream fabric for base
- 1/8″ green ribbon
How-to:
Step 1: On scrap piece of cardboard, place 3 (5/8″) shells with their ridged outsides facing up. Arrange shells close together to form a flower. Apply hot glue over the center to connect shells; let dry. Repeat to make 2 more small flowers and 4 large flowers, using the 1″ shells.
Step 2: To paint shell flowers, wet shell with water and paint dab of paint in deepest part. Gently swish brush to get faint wash of color to outside edge. Repeat with remaining 2 shells. Paint remaining shells in colors shown; paint outside of shells you’ll use for leaves green. When dry, paint all with glaze.
Step 3: Use Fabri-Tac to glue pearl to center of each flower. Cut 1″ lengthwise strips of print fabric; wrap around larger hoop to cover entirely, gluing ends to inside. Place base fabric over smaller inside hoop. Place larger hoop on top. Trim fabric base and glue to inside edge of the smaller hoop, to keep hidden.
Step 4: Once dry, remove outside hoop. Arrange flowers, using photo as guide; glue. Glue ribbon stems to flowers, extending 1/2″ beyond hoop. Glue on shell leaves. Place large outer hoop back over smaller hoop.
For more crafting fun, keep reading!
Studies Show Crafting Boosts Mood + Reduces Dementia Risk: 6 Easy Paper Crafts
How to Throw a ‘Paint and Sip’ Party at Home — Pro Tips Make It So Easy + Fun
Study: Creating Art Keeps Your Brain Healthy & Young; 8 Easy Projects to Try Today