Layered Jell-O Is the Perfect No-Bake Delight for Your 4th of July Spread — 3 Easy Recipes
This unmolding trick keeps your layered wobbly treat intact!
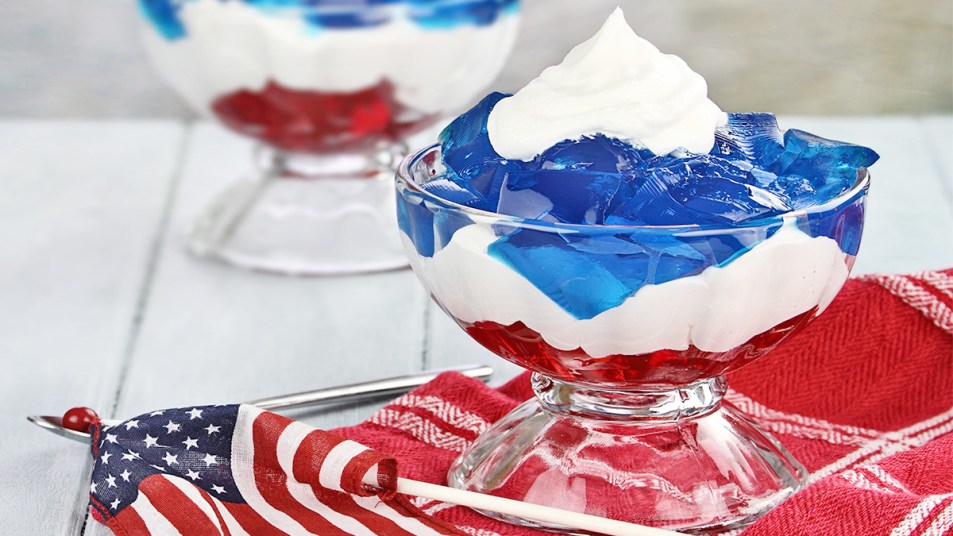
Need a festive dessert to add to your 4th of July spread? Layered Jell-O is a yummy option that’s sure to impress — and it’s a summer winner since it requires no oven. Plus, it’s easy to make ahead and keep refrigerated until you’re ready to serve. Getting clean layers of gelatin and other ingredients doesn’t have to be tricky as long as you keep a few tips in mind. Keep reading to learn how to make layered Jell-O and three recipes that will steal the show at your gathering!
The ingredients in layered Jell-O
This dessert contains layers of flavored gelatin and sometimes additional ingredients such as whipped cream or fruit. The process of layering this treat varies too. Some recipes call for pouring and chilling the layers in the same mold, while others prepare the layers separately and then assemble them into serving glasses. Either way, it’s a sweet and wobbly treat you can customize with your favorite gelatin flavors and/or pantry staples.
3 tips for making a layered Jell-O dessert
To nail solid and even layers, use these three tips when making your layered Jell-O delight.
1. Make sure the gelatin mixture is fully dissolved.
While powdered flavored gelatin is a convenient option, be sure to mix it thoroughly with water to avoid clumping. Many layered Jell-O recipes use boiling water to help dissolve the powder so it forms a smooth liquid.
2. Give each layer ample time to solidify.
Allowing the layers to completely chill before adding another one or assembling them together prevents a watery dessert. Plus, it produces clean layers for a wow-worthy effect.
3. Carefully unmold the dessert before serving.
Since Jell-O is so delicate, you’ll want to be careful when removing it from the mold. Otherwise, the layered dessert may break apart just before serving. The 1:07 mark of this Allrecipes video shows how to gently unmold layered Jell-O, especially if you’ve made a large-sized dessert.
3 delicious layered Jell-O recipes
Here, you’ll find three recipes for making this sweet tooth-satisfying dessert! (Click through for more Jell-O desserts.)
Berry Fourth of July

In this recipe from Victoria Belanger, author of Hello, Jell-O!, fresh fruit and vanilla ice cream turn unflavored gelatin into a patriotic party hit!
Ingredients:
First layer:
- 1 Tbs. (1 envelope) unflavored gelatin
- ¼ cup cold water
- 1 cup boiling water
- ½ cup sugar
- ½ cup fresh blueberries
- ½ cup sliced fresh strawberries
Second layer:
- 2 Tbs. (2 envelopes) unflavored gelatin
- ½ cup cold water
- 1 cup boiling water
- ¼ cup sugar
- 2 cups (1 pint) vanilla ice cream, at room temperature
Directions:
- Active: 30 mins
- Total time: 6 hrs or overnight
- Yield: 8 servings
- First layer: In bowl, sprinkle gelatin over cold water and allow gelatin to absorb water for 2 minutes. Add boiling water; stir until gelatin is fully dissolved. Stir in sugar. Refrigerate until thickened, about 45 minutes.
- Arrange blueberries and strawberries in pattern on bottom of 6-cup mold; gently spoon clear gelatin over berries. Refrigerate until gelatin is set but not firm, about 30 minutes.
- Second layer: Meanwhile, in separate bowl, sprinkle gelatin over cold water and allow gelatin to absorb water for 2 minutes. Add boiling water; stir until gelatin is fully dissolved. Add sugar; stir until dissolved. Stir in ice cream until mixture is smooth. Let mixture cool to room temperature without stirring, about 30 minutes, then gently spoon into mold over berry layer. Refrigerate until firm, at least 4 hours. Unmold and serve.
Layered Jell-O Cups

This recipe comes from Woman’s World Associate Food Editor Emily Boyette and involves layering solid Jell-O with whipped topping for a festive red, white and blue treat. “These are perfectly cool treats when you’re trying to beat the heat,” she promises.
Ingredients:
- 1 (6 oz.) package berry-blue Jell-O
- 1 (6 oz.) package strawberry Jell-O
- 4 cups boiling water
- 1 (16 oz.) tub whipped topping
Directions:
- Yield: 12 servings
- Whisk packets of berry-blue and strawberry Jell-O in separate bowls with 2 cups of boiling water each. Pour them into separate pans and chill 4 hours. Once solid, cut them into small cubes and start assembling.
- Among 12 glasses, layer red Jell-O, whipped topping, blue Jell-O and dollop of extra whipped cream on top. Serve.
Classic Rainbow Mold

Our test kitchen suggests using your favorite gelatin flavors to prepare this show-stopping treat with alternating fruity and creamy layers!
Ingredients:
- 5 packages (3 oz. each) flavored gelatin in 5 different colors
- 6¼ cups boiling water
- 1 can (14 oz.) sweetened condensed milk, 1¼ cups
Directions:
- Yield: 12 servings
- Working with 1 package of gelatin at a time, in small bowl, add 1¼ cups boiling water to 1 package gelatin and stir until gelatin is fully dissolved. Let mixture cool to room temperature, then pour ¾ cup dissolved gelatin mixture into 7-cup mold. Refrigerate until set but not firm, about 15 minutes.
- Add 3 Tbs. condensed milk to remaining gelatin; stir until mixture is smooth. Let mixture cool to room temperature, then pour over clear gelatin layer in mold. Refrigerate until set but not firm, about 15 minutes.
- Repeat process for each flavor of gelatin to create 10 layers, 1 clear and 1 opaque layer of all 5 gelatin colors. Gelatin must cool to room temperature or cooler before spooning it over layer in mold. It may be best to use 2 small bowls for each flavor, one for clear and one for opaque gelatin to cool in before pouring each into mold. Have 2 additional small bowls on hand so you can begin to prepare next flavor layers while preceding layer is cooling. Refrigerate finished mold until firm, 4 to 5 hours. Unmold and serve.

For more no-bake desserts, check out these recipes below!
No-Bake Coconut Cream Pie Recipe Is Extra Delicious Thanks to This Shortcut: My Taste Test Results
Viral Shaved Ice Recipe Is a 30-Second Treat That Uses 1 Ingredient + No Fancy Machine
Forget Fireworks — These Fourth of July Trifles Are the Real Showstoppers: Easy + Quick